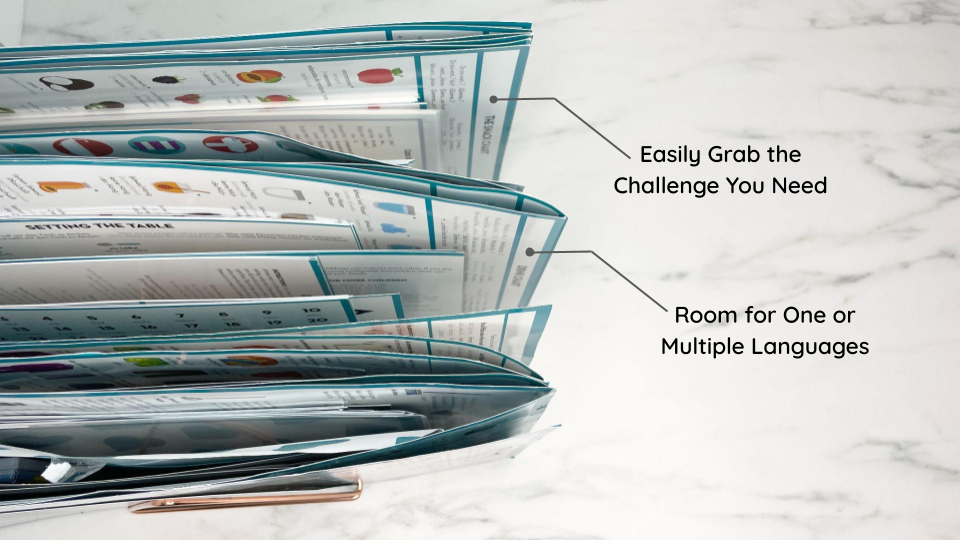
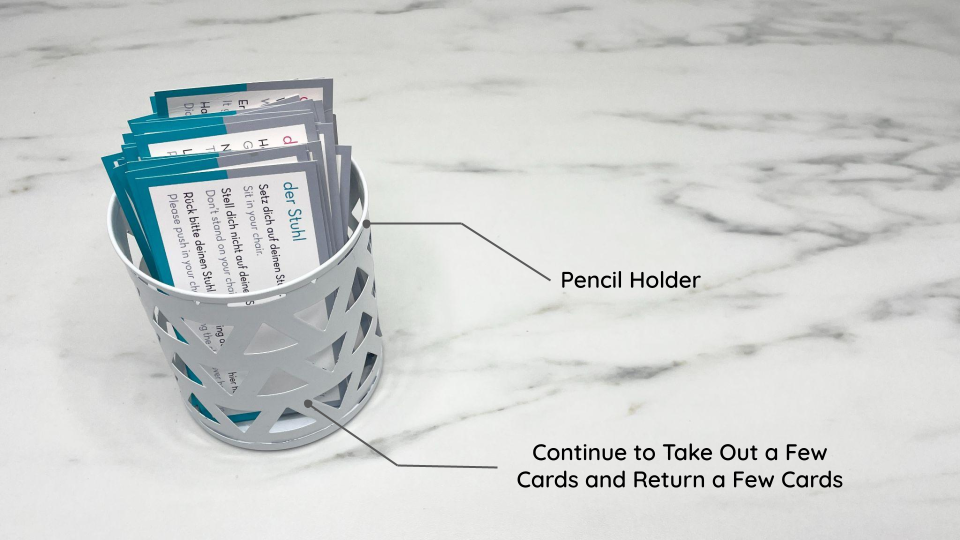
You can see that the posters are in their own clear portfolio pouches and are lying completely flat. Then the challenge pages are grouped in clear folders (see below) by box. And the label cards have rubber bands around each set.
I like this when I travel, but I don’t like it out in my house because I’m not sure where to put it. When I place it next to our drawers in the front room where we do school work, it gets knocked over a lot, especially in the middle of the night by “Cleany” our sweeping robot.
Disclosure:Some of the links below are affiliate links. This means that, at zero cost to you, TalkBox.Mom will earn a commission if you click through the link and make a purchase.
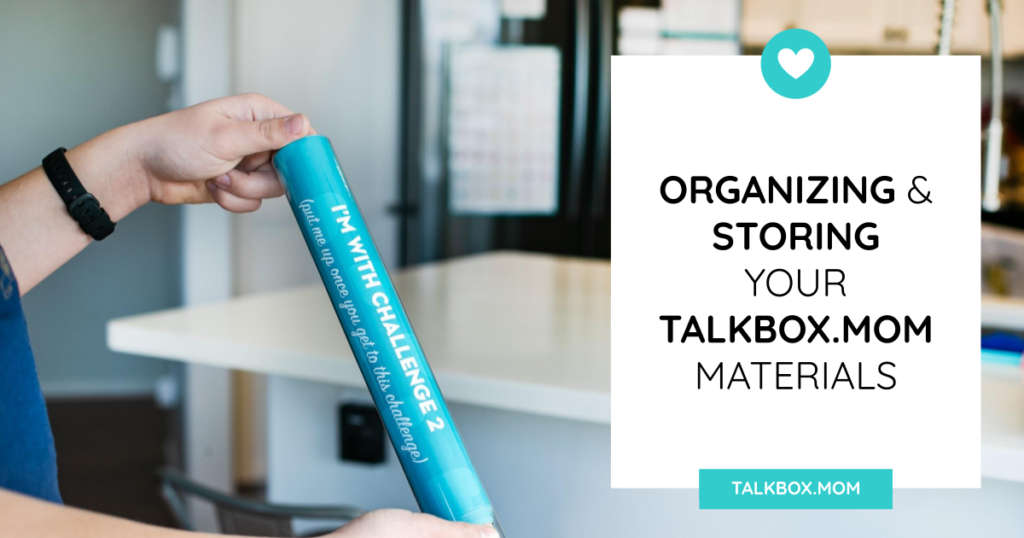
The TalkBox.Mom Program is a full immersion program for your family that has you talking from day one as you continue to work far down the path towards fluency.
As we lay the foundation for the language spoken in your home, we use beautiful charts and guides with full phrases that you’ll want to have easy access to reference even when you complete a box with those charts and guides.
So after you work through a cute teal box and move on to the next, how do you organize all the material to be able to access it easily when you need it? Because you forgot how to say something and need to check it again! (And you should! Because that makes the connection in your brain even stronger!)
Adelaide’s Favorite Storage System
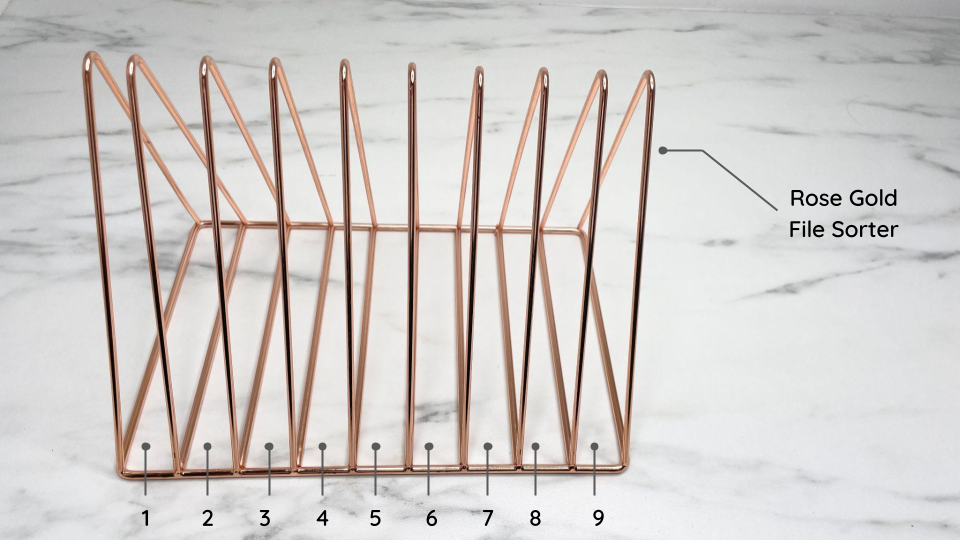
When it comes to storing my TalkBox.Mom materials, I want to be able to grab exactly what I need whenever I need it. And that’s pretty often because I might suddenly forget a phrase or want to compare a phrase in another language. So it’s super important to me that my guides are super accessible, and it takes me no time at all to grab what I need.
This rose gold file sorter is perfect because it has a space for each of the nine boxes. I keep it on my top shelf where I can easily see all the guides at eye level, but my youngest can’t ruin a good day by destroying it.
All of the posters can lie flat and be right next to their challenges, so if I want to grab a whole box, I can. Or if I want just one challenge, I know exactly which rung to go to because they are all in order. Plus, I can fit one or five languages in each space, which is perfect for being able to look at the same chart in another language if we get confused or want to practice the phrase, section, or guide in more than one language while reviewing or even when adding in a new language.

It’s super easy for me to see which area belongs to which box, so if I think of something I want in a specific box, I can find it very quickly. You can imagine when it’s at eye level, I can just thumb through each part, and see whichever guide in whichever language I need.
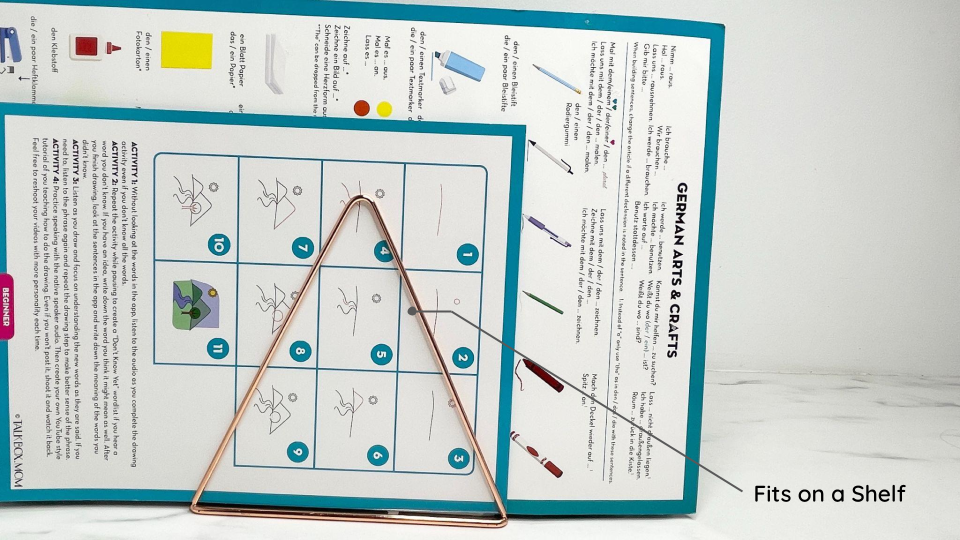
Lastly, it’s important to me that it doesn’t take up a lot of room and fits on one shelf. I also want it to look cute, and this delivers! Plus, it’s under $20 to store the challenge pages and posters.
Storing Label Cards
The TalkBox.Mom Label Cards obviously don’t fit into the rose gold file folder. I store those a little differently because I’m always cycling through new cards to focus on.
The Snacks & Kitchen Box Label Cards

I like to keep my label cards in the kitchen near the item that I’m using, so I remember to use the phrases, and if I forget how to say something, I can see it very quickly in the moment. If it’s not near the item, it’s much harder to take the time to look up what I need, especially if I’m working in the kitchen.
Some cards I have to put up a little higher than the item because we’ve got a little one that thinks they are stickers that are meant to be ripped off and thrown on the ground.
For the first box, I don’t like having all my label cards up at once because they can become white noise, are easy targets for the toddler, and can feel like too much.
Instead, I have a few cards out at a time. When those feel easy, I can switch out my cards and put a few new cards out.
I keep this on top of my fridge unless my mom comes into town and puts a bunch of cereal on top of my fridge, knocking the pencil holder down. I told her that I don’t want anything on top of my fridge, “Please, leave it empty,” but she just laughs…it’s her favorite place to store things that can totally be stored not there. 😉
The Chores & Cleaning Box Label Cards

These cards are constantly being used to assign and complete chores. Each card has a sticker magnet that I cut out and place on the back. I was able to cut each sticker magnet into fourths and place a tiny one on the back of each card.
The tray holds all the chore cards in two languages, allowing me to easily see which chore cards I want to grab and then place on the side of my fridge. This way I can assign different chores and practice different phrases. If your fridge isn’t magnetic, consider using a metal board from Ikea. I use a lot of these!
The Room Label Cards
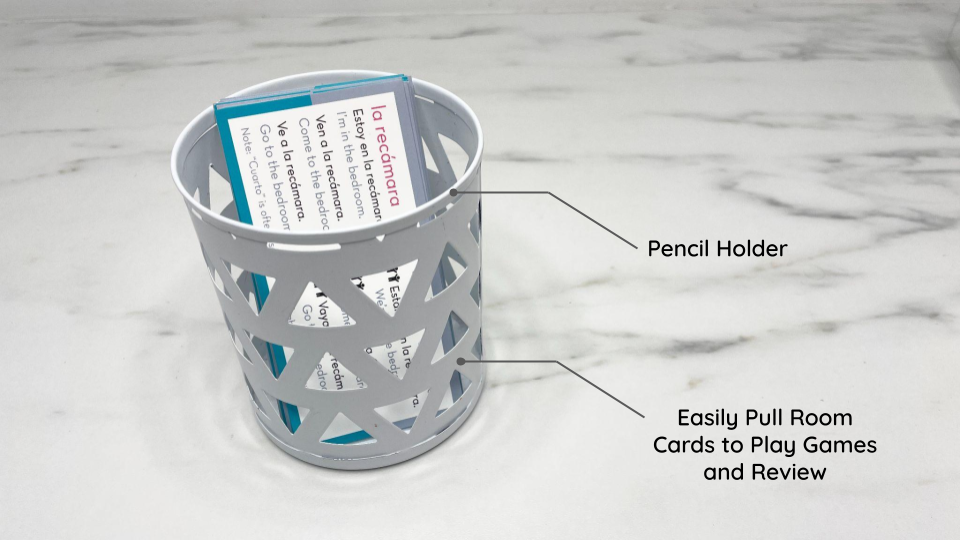
When I first start a Challenge 2 in the Action, Rooms, and Games Box, I like to put just a couple room cards up and practice those. Then I add a couple more room cards without taking any down. Then we practice all of those. Then I slowly add more until we get them all down. At that point, I’ll take down the cards to play games, putting back up any cards that we start to struggle with even slightly.
There are four cards in my house that are always up next to the backyard because I want to remember to yell to my kids in the yard to come inside or tell my kids in the TV room to go outside.
The Bathroom Label Cards
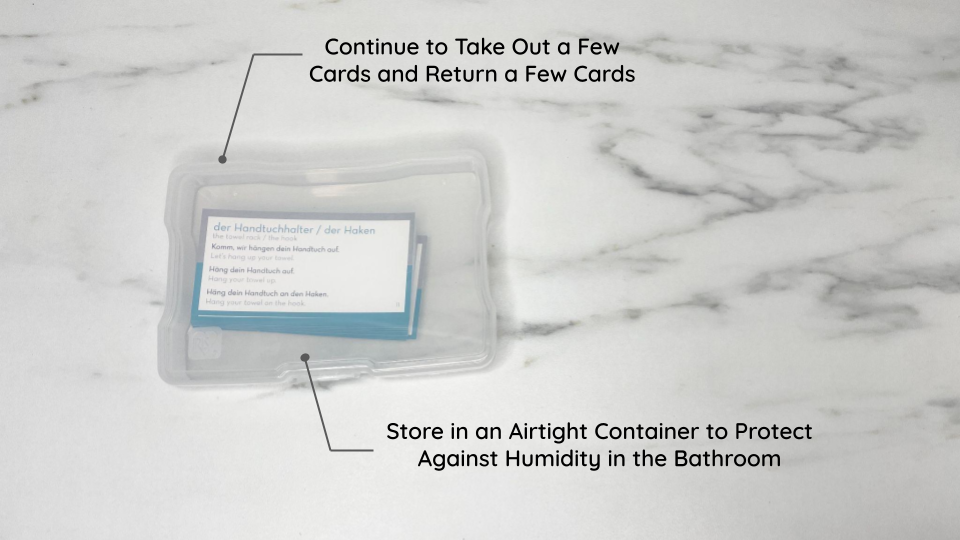
For the bathroom label cards, I try to change them out much faster than other cards because my kids get the bathroom a little too steamy. If I leave the same cards up too long, they get weird looking.
I keep this container sealed on the top shelf in their bathroom, so I can grab it really fast. It’s nice when it has sticky tack in it and someone hasn’t climbed up on the counter to swipe it out of there and use it for something else…
A ziplock bag could also be used for this.
Storing All Label Cards

Alternatively, you can keep all your label cards in one box and pull them as needed. I do this for a set of label cards where we’re not focused on that language for those cards at the moment.
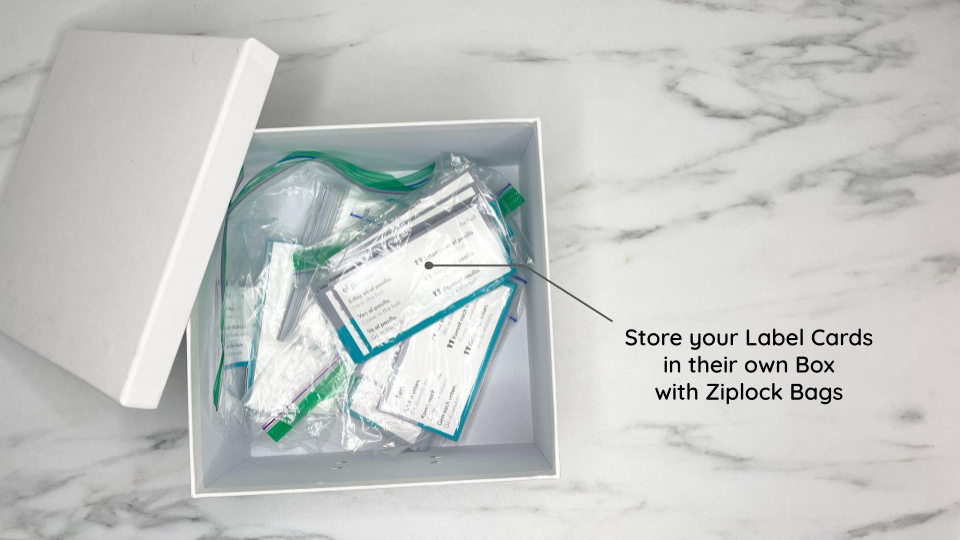
This is the same thing, but the version for people who can’t find a rubber band because their kids ran off with them but put plenty of sandwiches in ziplock bags… so they make due. (Obviously, I have more label cards in ziplocks than rubber bands, so we know who this version is for.)
Adelaide’s Favorite Storage System for Travel
If I’m heading down to Mexico or over to Germany, for example, I do take ALL my things because it’s so incredibly helpful and makes our trip so, so, so good because we’re dialed in to 100 with the language. This works well for me because we usually stay at an Airbnb (great way to make friends in the neighborhood!), and everything can fit flat in a suitcase.
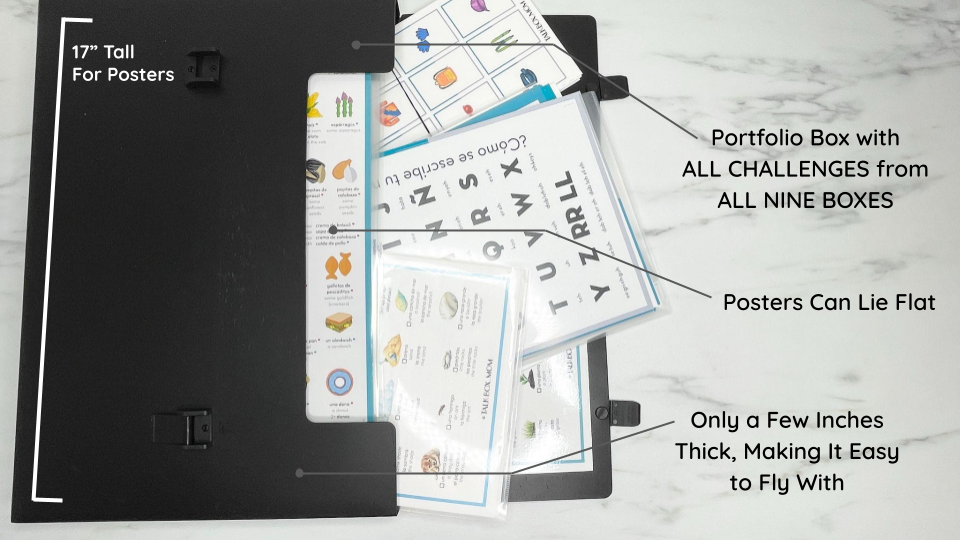
This portfolio holder is just a few inches thick and can hold every challenge page, poster, and label card from all nine boxes in one spot with the posters lying flat. It also fits in a suitcase, so it’s perfect to travel with!
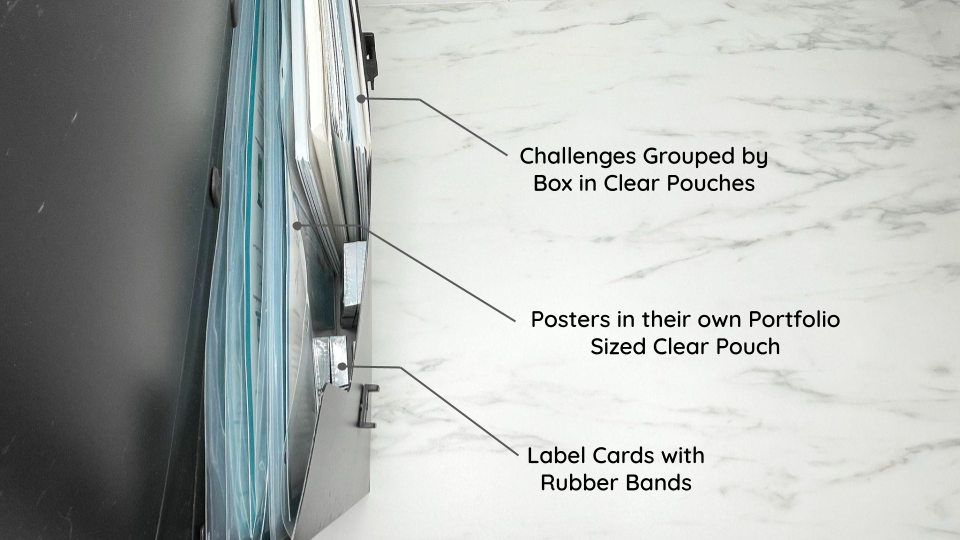
You can see that the posters are in their own clear portfolio pouches and are lying completely flat. Then the challenge pages are grouped in clear folders (see below) by box. And the label cards have rubber bands around each set.
I like this when I travel, but I don’t like it out in my house because I’m not sure where to put it. When I place it next to our drawers in the front room where we do school work, it gets knocked over a lot, especially in the middle of the night by “Cleany” our sweeping robot.
These are my clear pouches. I really like grouping together challenges in them that I’m reviewing because I can easily carry them around without losing pages. These are really nice for the Washing Hands challenge because I can take all the different charts to different sinks, leaning them up against a wall or putting them on a stand. Plus, I can easily shift which part is at the front, so we can focus on different workouts.
Storing Printables
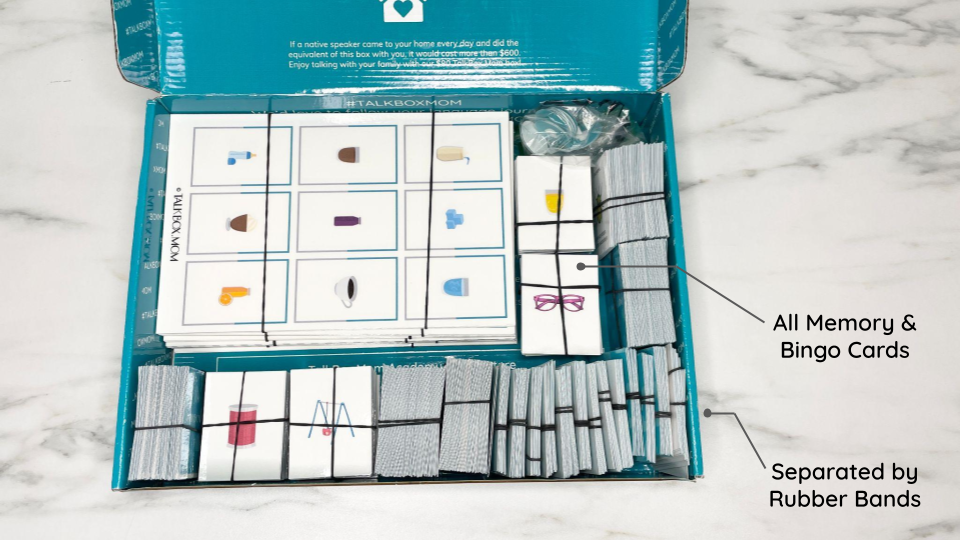
When I travel and at home, I like storing all of my memory cards and bingo printables in this shipping box. They all fit below the fold of the box, and I can easily see what I’m looking for.

I group all my bingo cards by box, so it’s easy to find them when we want to play a bingo game with a specific challenge.

When it comes to the memory cards, I like to separate them by row on the charts if there are a lot of memory cards for that challenge. This allows us to focus row by row if we want or for me to find exactly which cards we want to use for a specific game.
Storing Cubes for Printable Games
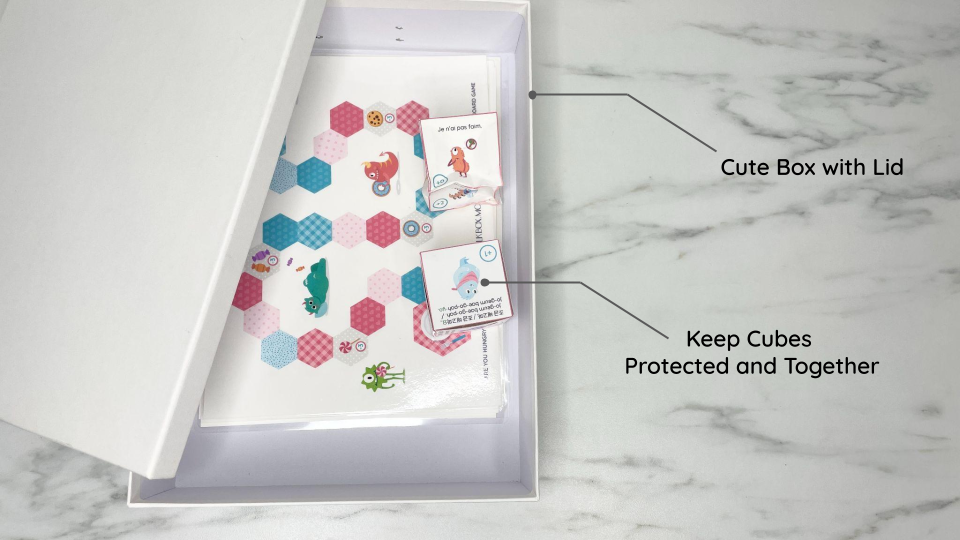
When I travel, I don’t take the games with cubes with me because I don’t want to smash them. At home, I store them in a box where they are safe… until we play an intense game at least.
Storing Challenges in a Binder
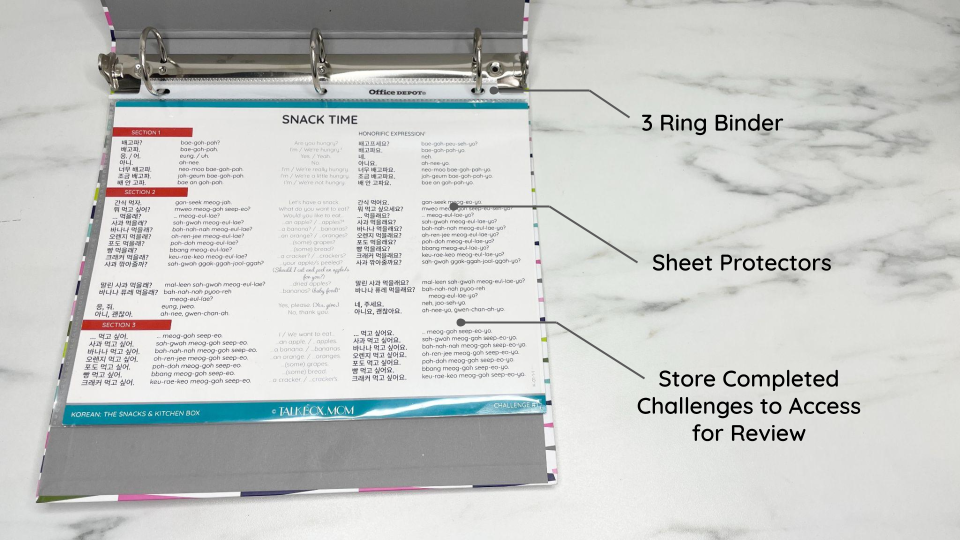
When I’ve completed a challenge, I don’t need to keep it hanging on my wall for constant reference. But every now and then, I might forget a phrase or just want to review phrases from that challenge. A binder can be taken to any room in the house, keeping the challenges and workouts within arm’s reach. The clear sheet protectors keep the charts clean, and it’s easy to see both sides for quick reference. I don’t personally use this in my home, but this is a great option to keep everything you need handy.
Storing Challenges in an Accordion Box
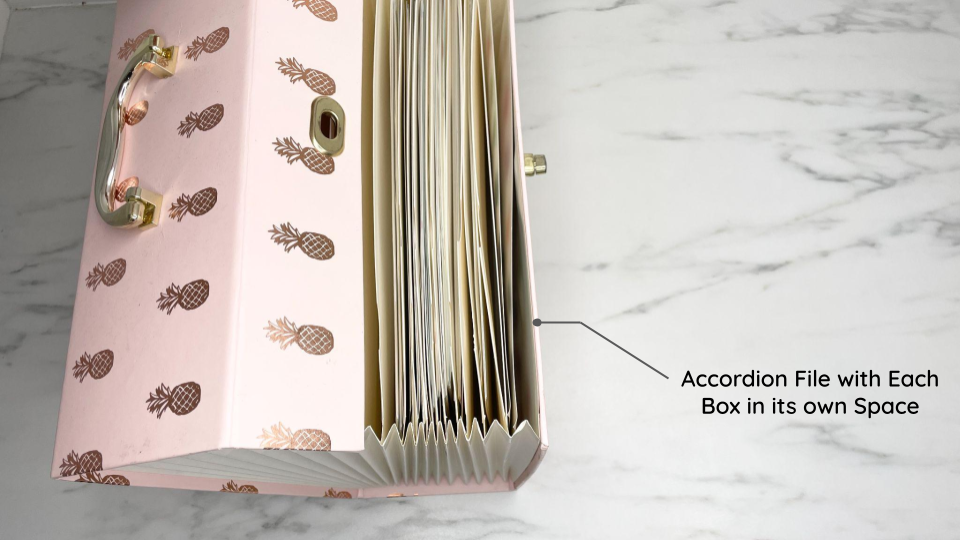
This accordion file will keep items flat and organized. Use your TalkBox.Mom heart folders or use clear pouches to group challenge items together so nothing gets lost. Keep smaller items in rubber bands. You can fit the challenges from all the boxes in this, or use it to separate challenges in different languages.
Storing Phrasebooks, Fluency Packets, and Homeschool Phrases
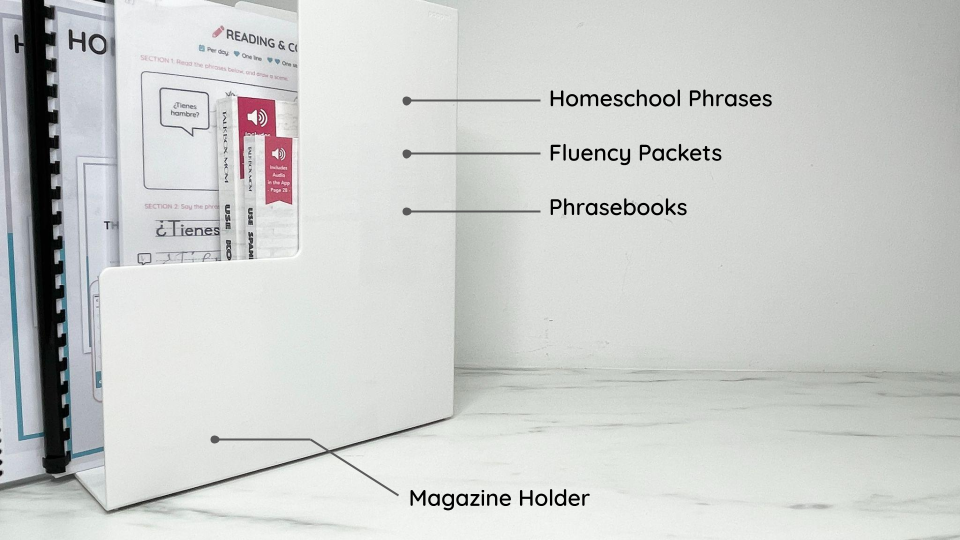
I’m obsessed with magazine holders. I have a couple on my shelf to separate subjects, so I hold my phrasebooks, homeschool phrases, and fluency packets in these. When I need any of those guides, I know exactly where to go to grab them. Plus, my kids know where to put them back.
More Ideas
I talked about these organizational methods in this week’s live in the TalkBox.Mom Accountability Group. Here are a few more products mentioned in the live:
- The double-sided library cart with lockable wheels that holds all my homeschool materials. I can roll it somewhere out of sight when I travel and rent out my house on aribnb.
- The clear acrylic book stand that I keep on the kitchen counter. It holds whatever challenge I’m working on at the moment where it’s easy to see and doesn’t get wet.
- These modular drawer organizers easily hold a lot of label cards so they don’t get lost on the shelf.
- This little document stand sits right on my computer desk and holds challenges upright so they’re close by.
- These super cute rose gold clip magnets keep charts in place on my refrigerator and make it easy for me to switch to whatever chart or challenge we’re currently working on.
- These Book Buddies adhesive flags you can write on were really popular! They come in all kinds of cute varieties—mine are In the Woods. Use them to mark the pages where your favorite phrases are located.
Favorite Storage Methods from Other TalkBox.Mom Families

Ellen says:
I like storing my TalkBox.Mom materials in a drop file box because it fits all of the boxes in such a small space and allows for super easy access to the materials. When I need to access anything from the next box or from a previous one I just reach into whichever folder I need to grab the materials. The rolled up posters like the ones from the Bathroom or Clothing boxes fit behind the hanging files in the box so that everything can stay in one place.
I have the cards from boxes 1 and 2 displayed and plan to put the others up as I reach those boxes. For now I have everything for box 3 and above in the folders including the cards.

Erin says:
Now that we’ve completed a number of boxes, I was running out of storage space and also wanted an easier way to find past materials for quick review. I’ve organized my boxes into a binder. It’s super simple, but makes my brain work better I was able to condense all the extra roll up posters, cards and game pieces (stored in these pouches)/dice into a single box. This #hotshot is ready to ramp up our Spanish and get more review in this summer!
I used a 1” binder (but will need to increase to a 1.5 or 2” by the time we’ve finished), a pack of heavy duty page protectors and a large pack of “slash pockets”/binder pockets.
They are organized in order, with the binder divider pockets acting as both dividers and the storage for the main page along with challenge pages. Each regular sized poster is in a page protector – I leave these on when I grab something out for review – some extra protection is always helpful in my household! The binder has pockets at the front and back where I store our flat/laminated add-ons, like the Homeschool and Scavenger Hunt packets.
Finally, I was able to condense all of my cards and oversized posters not currently hanging into a single box! The only thing I don’t like is having the cards/posters stored separately from the materials in the binder, but I went back and used a highlighter on the challenge pages so I’d know there was an associated extra.
We keep one of the food (box 1) and one of the drink (box 4) posters up all the time for easy reference, along with one or two relevant posters or cards, but having the rest easily organized and accessible has made review much easier! I love being able to flip through all our materials and just pull out whatever seems fun or needed, with no mess or rearranging of cabinets.

Janelle says:
I store the posters in menu holders for safe-keeping and easy access. The menu holders are easy to keep clean, keep the posters from getting bent or marred, and they’re easy to store on a shelf and access whenever we need them!
My overall system, of everything kind of scattered around the house, works for us because it is neatly stored yet still accessible when and where I need it. I store all the menus in the kitchen in the cupboard with my recipe books. They’re in a central location and easy to access when needed. When we are actively using the chart, I keep the menu with that specific chart where it makes the most sense. We are soon to be in the bathroom box (box 3) so that menu I will keep in the bathroom while we learn those phrases.
I have also taken the menu holders with us when we’ve gone out (e.g. action chart to the park) and I don’t have to worry about bending the original posters or getting them dirty!
I use the 4-view menu holders – the ones that encase the sheet in vinyl. It opens into a double-page spread. They are very durable.
I use a separate menu holder for each poster “set”. So one menu holder holds the food chart, a separate menu holder holds the posters for box 1 that has the reference phrases on it, a separate menu holder holds the actions chart, etc. This way, each poster set is protected and easy to access individually.
The menu holders can be expensive (although personally I think they’re worth it), and I also had second thoughts about cutting the large food chart in half to make it fit. However, I’m glad I did it. I haven’t come up with a great system for the cards. I just keep each set in a different snack-size ziplock bag and pull them out and hang them up as needed. I’m hoping to find something akin to a business card holder or baseball card holder that will fit the cards well so I can store them in a binder. I haven’t searched much for that yet.
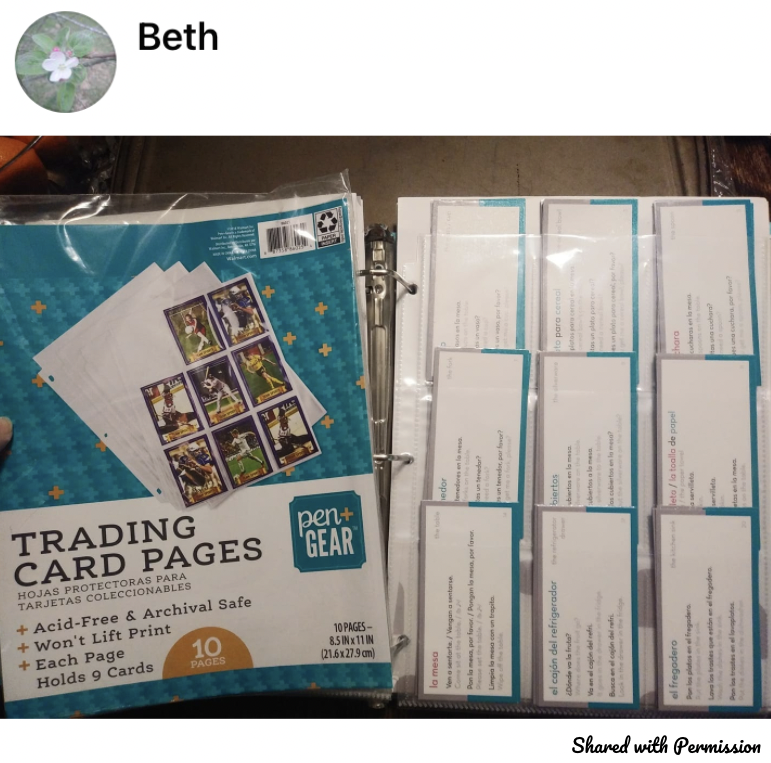
Beth says:
I organize most things for school and home in binders or notebooks and keep them on bookshelves throughout our home. The slots on the trading card sleeves can hold several of the label cards and the edge of the card sticks out of the top enough for me to see the card number and the key phrases quickly.
I only display the cards in our house a few at a time so we don’t tune them out, and the organizer page allows me to quickly and easily put them back and pull out a few new ones.
The only con to using these pages is that the cards will fall out if you turn the binder upside down. Did that once. 🙃

Courtney says:
I love that I can store all of the material for multiple languages in one easy to access place. (Teal 21 pocket file folder here) There are enough slots to have one per box of each language and also 2 extra; one for the homeschool phrases and extras in each language. I keep the posters and memory and bingo printables in one TalkBox.Mom box. I got to keep one pretty box around and everything was stored and easy to access. It was a cheap all in one system for 2 languages, but it doesn’t store my posters. I like them out, though, and have the posters scattered around my house in the appropriate places.
It’s organized, easy to flip through quickly, and keeps things tidy—no annoying lid in the way that I need to fumble with, I can grab-and-go quickly.
I keep posters that I am using out, as well as the regular sheets and cards that we want to review. Then I know right where to put them when I am done, and don’t lose any of the label cards. Sometimes, though, I grab-and-go with the playground sheets, or I need to review the diaper changing sequence and I can find what I need quickly and take it with me.
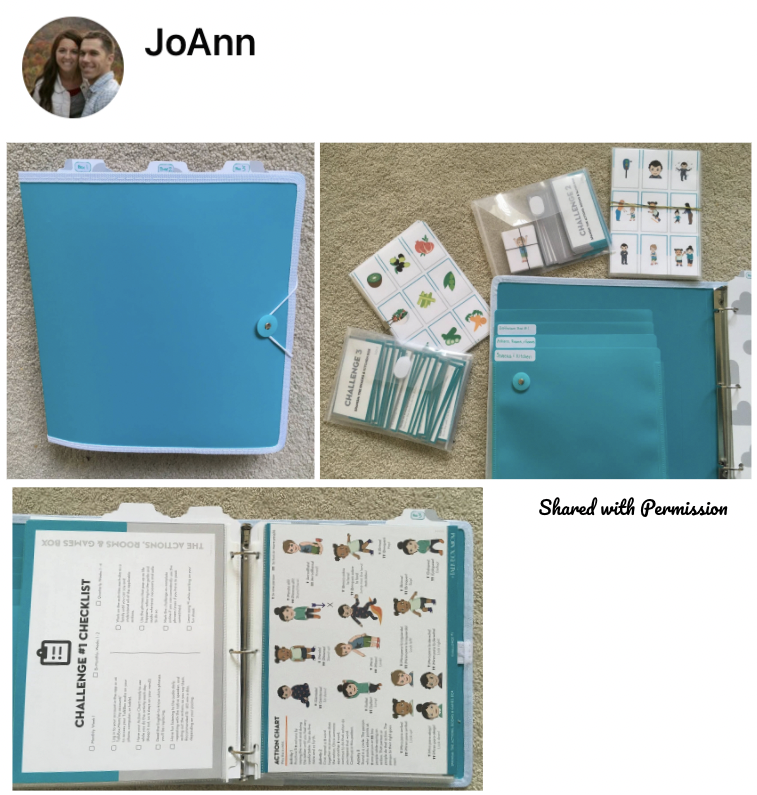
JoAnn says:
I wanted something that was very easy to find, reference, and use. I also did not want it to take up a lot of space. I also hope for the idea of taking things with me if needed, too, although I have not done that yet. These were the things I was looking for and this has worked for all of those.
I have not found any cons with this system yet— I have only been using it for a couple weeks, but there might be cons or things others might not like.
I have each box divided up by tab, and I take the things from each challenge as I need them and I put them up around the house or in our basket to use as we are working through that box. If the charts are big, I photocopy them so there is a placeholder in the binder and I store all my posters in a cupboard. The gray basket has mini baskets where I put label cards, games or whatever we are using for that basket, (that are stored in the clear plastic envelopes/pockets in the binder when not in use). I laminate ANYTHING that I think will get wet/sticky or I will want to use a dry erase maker on. As of now I have been taking things out of the page protectors, but I know the box 2 charts I will want to grab and use a lot throughout the house, so I will leave them in and hang them on a little hook instead of using putty and putting them on my wall.
I love that at a glance I can see what we have coming, and I can easily find things and pull them out for review. I love that all my current box stuff is in one place (except things posted around the house). I love that the cards and games are stored right there with all the charts and not in a separate place, and I LOVE that it all matches and it is color coordinated!

Hannah says:
I’m loving this organization! I bought 5×7 photo sleeves so I can put the cards in, essentially making a book. I put the audio on autoplay and read along with it. It just works better for my brain this way. I felt overwhelmed with having a stack of cards, but having them in pages for some reason makes it feel more doable.
My 8-year-old is more involved and loves to look through the binder. I am listening to the audio more than I was. It’s portable and we can take it places so easily! I do not take the cards out. The ones that we are working on, I write down in the planner. We usually play games or add actions to the phrases we are learning for a couple of days, then start using them in real life. My kids are masters of correcting us if we don’t use the Spanish we know, so I don’t find that I need to keep the cards up as reminders.
I started storing this way because I was overwhelmed with the amount of label cards. It felt like too much to learn. Laying them all out helped me to see the patterns, and reading/listening through like pages in a book helps me to be focused. I do still pick our intentional phrases out of order, of course.
I haven’t done this yet, but am considering adding star stickers to the ones that we’ve mastered as additional motivation.
HOW DO YOU STORE YOUR TALKBOX.MOM MATERIALS?
What’s your favorite way to share your TalkBox.Mom materials? Comment below. I’d love to hear your great ideas!
Leave a comment